Getting Started with a Fresh Linux Mint Installation: Tips for New Users
I still remember the feeling of dread. It was years ago, after a week of intense work on a critical project. I came into my office, powered on my machine, and was greeted not by a login screen, but by a blinking cursor on a black void. The hard drive had failed catastrophically. The project files were backed up, thankfully, but the operating system, all my carefully installed software, and every custom setting were gone. The next two days were a blur of reinstalling, reconfiguring, and trying to remember all the little tweaks that made the system mine. That painful experience sent me on a quest to find a better, more resilient way to set up a new Linux system from scratch. I promised myself I’d never be in that position again, and the methods I’ve refined since then are what I want to share with you today.
A resilient Linux Mint installation is achieved by strategically partitioning the disk to separate the system from user data, implementing a firewall with a secure default policy, and configuring a system snapshot utility to protect against configuration errors.
1. Tip #1: Give Your Files Their Own Room (A Simple Partitioning Guide)
Think of your hard drive like a large, empty closet. You could just throw everything in there, but it would quickly become a mess. A much better approach is to divide the closet into sections: one for your clothes (the operating system) and another, much larger section for your storage boxes (your personal files). In Linux, this is called partitioning, and it’s the secret to a system that can easily recover from disaster.
The Magic of Separating Your System and Your Data
In the Linux world, the operating system and your programs live in a partition called / (root). All of your personal data – documents, downloads, pictures, and even application settings like your Firefox bookmarks – live in a separate area called /home.
By creating dedicated partitions for / and /home, you build a firewall between your system and your data. The primary advantage is what I call “reinstallation resilience.” If your operating system ever becomes damaged or you simply want to upgrade to a new version of Linux Mint, you can completely wipe and reinstall the system on the / partition while leaving your /home partition – and all the personal files within it—completely untouched.
How to get there?
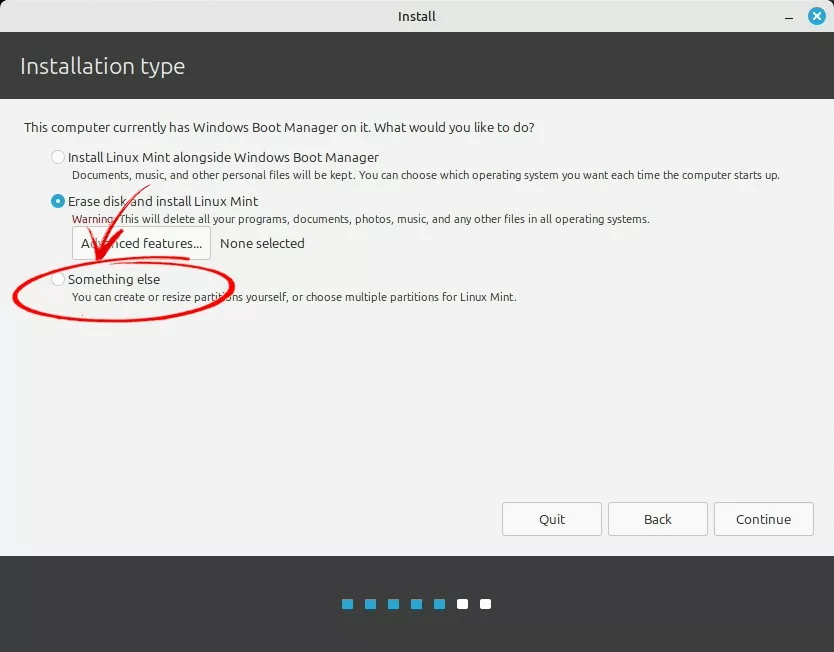
During installation, just go along with the wizard of installation until you get the step as the screenshot below, then you just click the option ‘something else’ and then click the Continue button.
A Simple, Safe Partition Plan for Modern Computers
Modern computers use a system called UEFI to boot, which requires the hard drive to use a GPT (GUID Partition Table) layout. For the filesystem itself, the safe, stable, and default recommendation for new users is Ext4. It’s incredibly reliable and requires almost no maintenance.
Here is a simple and effective partition plan for a standard computer with a 500GB to 1TB drive:
| Partition Purpose | Mount Point | Filesystem | Recommended Size |
| EFI System Partition | /boot/efi | FAT32 | 512 MB – 1 GB |
| Swap | (none) | swap area | Slightly larger than your RAM, I set it to 4000MB |
| Root (System) | / | Ext4 | 60GB |
| Home (Your Data) | /home | Ext4 | Remainder of disk space |
- EFI System Partition: This small partition is required by modern UEFI systems to store the bootloader. 1GB is a generous size that ensures future flexibility.
- Swap: The primary reason to create a swap partition is to enable hibernation (suspend-to-disk). For hibernation to work reliably, the swap partition must be slightly larger than your computer’s total RAM. If you do not plan to use hibernation, a smaller swap space or even none at all is feasible on modern systems with ample RAM.
- Root (
/): This is for the operating system and all installed software. 100-150GB gives you plenty of room for growth. This generous size is also crucial because it provides ample space for system snapshots if you choose to store them on your main drive, which we’ll cover in Tip #3. - Home (
/home): This is for you! All your documents, pictures, music, and configuration files go here. Give it all the remaining space on your drive.
A Word of Caution
Manual partitioning is powerful but not recommended for absolute novices. A misstep during the installation could wipe all your data. Always make a full backup of any important files before you begin.
2. Tip #2: Set Up Your Digital Bouncer (A Simple Firewall Guide)
Your new Linux Mint system comes with a powerful but easy-to-use firewall called UFW (Uncomplicated Firewall). Think of it as a digital bouncer for your computer, controlling all the network traffic that tries to come in or go out. Setting it up correctly is one of the quickest and most effective security wins you can get.
Use this command to check whether the firewall is running or not. In case you see the returned message says it is inactive, don’t worry, you will enable it in the process I show to you late.
ufw statusYour First Line of Defense: The Uncomplicated Firewall (UFW)
The security principle we’ll use is “least privilege,” which sounds complicated but is actually simple: Lock the front door by default, and only open it for expected guests.
For a desktop computer, this translates to a highly secure baseline policy: deny all incoming connections by default, while allowing all outgoing connections. This makes perfect sense when you think about it. You need to connect out to the internet to browse websites and check for updates, but you almost never need random computers on the internet connecting in to your machine. This policy dramatically reduces your system’s exposure to unsolicited network traffic.
Commands to a Safer System
You can establish this entire security posture with just a few commands in the terminal.
- Set the “door is locked” policy for all incoming traffic:
sudo ufw default deny incoming- Allow your applications to access the internet:
sudo ufw default allow outgoing- Turn the firewall on:
sudo ufw enable- Check that the firewall is active and review your new rules:
ufw status verbose- The output should confirm the status is
activeand show your default policies.
Status: active
Default: deny (incoming), allow (outgoing)
In case you want limit OUTBOUND traffic, this the process you will take:
- Block all traffic that going out:
sudo ufw default deny outgoing- Allow only those ports which you needed, such as the ports which communicate with DNS, VPN, email service, etc,.
| Purpose | Port | Command |
|---|---|---|
| DNS | 53 | sudo ufw allow out 53 |
| HTTP | 80 | sudo ufw allow out 80 |
| HTTPS | 443 | sudo ufw allow out 443 |
| NTP (Time sync) | 123 | sudo ufw allow out 123 |
| Email (optional) | 587 | sudo ufw allow out 587 |
In case you allow a wrong port on outbound rule, you can use the following process to delete it:
- Check rules numbered:
sudo ufw status numbered- Delete rule by its number:
sudo ufw delete <number>Example:
sudo ufw delete 5Making an Exception: How to Allow File Sharing on Your Home Network
Since you use a deny-all outgoing policy, the best approach is to allow only LAN traffic (192.168.1.0/24) while keeping internet-bound outgoing traffic restricted.
This will let your Linux Mint machine communicate with devices inside your home network for:
- Samba file sharing
- SSH
- printers
- Syncthing
- local web interfaces
- device discovery
- other LAN services
while still blocking unexpected outbound connections to the internet.
1. First confirm your LAN subnet
Generally, Your current IP is likely in: 192.168.1.x, You can confirm with command
ip addr
Look for something like:
inet 192.168.1.166/24
/24 means your LAN range is:
192.168.1.0/24
2. Allow all outgoing traffic to your LAN
This is the simplest and usually the best rule:
sudo ufw allow out to 192.168.1.0/24
This allows your computer to initiate connections to other devices in your LAN, but not to the internet.
Check:
sudo ufw status verbose
You should see: 192.168.1.0/24 ALLOW OUT
Now trying to access your SMB connection in Nemo(File explorer in Linux Mint):
smb://192.168.1.x/
should work.
3. Allow incoming LAN traffic
Using the same way to add the following UFW rules and ensure they are listed in the returned list after you issued command: sudo ufw status verbose
sudo ufw allow out from any to 192.168.1.0/24 port 137 proto udp
sudo ufw allow out from any to 192.168.1.0/24 port 138 proto udp
sudo ufw allow out from any to 192.168.1.0/24 port 139 proto tcp
sudo ufw allow out from any to 192.168.1.0/24 port 445 proto tcp
4. Add useful LAN services individually (optional)
If you prefer tighter control instead of allowing all LAN traffic:
SSH
For managing another Linux machine:
sudo ufw allow out to 192.168.1.0/24 port 22 proto tcp
Syncthing
Incase you use Syncthing, allow:
sudo ufw allow out to 192.168.1.0/24 port 22000 proto tcp
sudo ufw allow out to 192.168.1.0/24 port 22000 proto udp
sudo ufw allow out to 192.168.1.0/24 port 21027 proto udp
CUPS printer sharing
sudo ufw allow out to 192.168.1.0/24 port 631 proto tcp
sudo ufw allow out to 192.168.1.0/24 port 631 proto udp
mDNS / Avahi discovery
For seeing devices by name like:
computer.localprinter.local
allow:
sudo ufw allow out to 224.0.0.251 port 5353 proto udp
sudo ufw allow in from 224.0.0.251 port 5353 proto udp
5. Check the final rules
Run:
sudo ufw status numbered
You should have something like:
[ 1] 137/udp ALLOW IN 192.168.1.0/24
[ 2] 138/udp ALLOW IN 192.168.1.0/24
[ 3] 139/tcp ALLOW IN 192.168.1.0/24
[ 4] 445/tcp ALLOW IN 192.168.1.0/24
[ 5] 192.168.1.0/24 ALLOW OUT
6. Test after adding the LAN rule
Test your WD/Samba share:
smbclient -L //192.168.1.x -U username
or open the shared local network resources in Nemo:
smb://192.168.1.x/
3. Tip #3: Create a Safety Net with Timeshift (Your System’s Undo Button)
Mistakes happen. A system update might break a critical application, or a new graphics driver could cause instability. Timeshift is Linux Mint’s integrated system recovery tool, and it’s your personal “undo button” for the entire operating system. Configuring it correctly from the start gives you a powerful safety net.
Timeshift is for Your SYSTEM, Not Your DATA
This is the most important concept to understand about Timeshift: it is a system restoration tool, not a backup tool for your personal files.
Its purpose is to save the state of your core operating system files, allowing you to “roll back” your computer to a time before a bad software change occurred. Because of this, your personal /home directory, which contains all your documents, pictures, and music, must be excluded from snapshots. Including it would make the snapshots enormous and, more dangerously, could cause you to lose personal work if you restore an older snapshot.
Configuring Your Safety Net
When you first launch Timeshift, it will ask for a few settings.
- Snapshot Type: Choose the default Rsync mode. It works perfectly with the recommended Ext4 filesystem and is the most reliable and simple choice.
- Schedule: A balanced schedule provides good protection without using too much disk space. A great starting point is:
- Daily: Keep 2
- Weekly: Keep 2
- Monthly: Keep 1 This schedule gives you recent recovery points for minor issues (daily), stable fallbacks for bigger problems (weekly), and a long-term archive (monthly), providing a great balance of safety and disk space.
- Manual Snapshots: The most important habit to develop is creating a manual snapshot before any high-risk action. Always create a snapshot right before you install new hardware drivers, run a large batch of system updates, or upgrade to a new version of Linux Mint.
Remember, if you follow the common practice of storing snapshots on your main drive for convenience, Timeshift saves them inside your root (/) partition. This is precisely why we allocated a generous 100-150GB to it back in Tip #1.
The Golden Rule of Snapshots
There is one single best practice that elevates Timeshift from a useful tool to a true disaster recovery solution: store your snapshots on an external drive.
Storing Timeshift snapshots on the same physical drive as the operating system is a single point of failure. If the main system drive fails, both your operating system and all the snapshots stored on it will be lost, completely defeating the purpose of having them.
Conclusion
Setting up a new computer can feel overwhelming, but it doesn’t have to be. By taking these three simple but powerful steps at the very beginning, you build a foundation for a stable and secure experience. Smart partitioning protects your data, a basic firewall protects your machine on the network, and a well-configured snapshot tool protects your system’s stability. With this resilient setup in place, you can explore, experiment, and work with confidence.