I Realized My VPS Was Wide Open — Here’s How I Locked It Down
It was late, the kind of quiet night where the hum of my laptop fan feels louder than it should, and I was alone at my desk doing what I’d done a hundred times before—checking logs on my VPS after a routine update. Nothing dramatic, just another pass through configs with a cup of coffee going cold beside me. Then I noticed it. A port responding that absolutely shouldn’t have been. My stomach sank in that slow, familiar way every security professional knows. As a cybersecurity architect, I’d helped companies lock down entire infrastructures—but there I was, realizing my own server was far more exposed than I was comfortable admitting. That moment sent me down a focused, methodical path to fix it properly, not with panic, but with clarity. If you’re reading this because you suspect your VPS might be wide open too, I’ve been exactly where you are—and I’ve learned how to lock it down in a way you can actually trust.
SSH hardening mandates disabling direct root login to mitigate brute-force vulnerabilities. Primary technical protocols include implementing asymmetric cryptographic keys (Ed25519), substituting password-based authentication, and delegating administrative tasks via sudo-enabled accounts.
While those fundamental steps provide a solid starting point, building a truly resilient infrastructure requires a defense-in-depth strategy that goes far beyond a few quick configuration changes. Securing a server is a journey, not a destination, and I have compiled a comprehensive guide detailing the essential practices I implement on every production environment to significantly reduce the attack surface. We will dive deep into everything from changing default ports to silence the noise of automated bots to deploying Fail2Ban for automated IP blocking and implementing Two-Factor Authentication (2FA) for that critical extra layer of protection. Stick with me until the end, and I’ll share the exact monitoring protocols and security audit checklists I use to achieve zero successful brute-force attacks and maintain full visibility over my systems. By the time you finish reading, you will have the tools and the roadmap to transform your vulnerable VPS into a digital fortress you can manage with absolute confidence.
Why is the Root Account the Primary Target for Automated Bot Attacks?
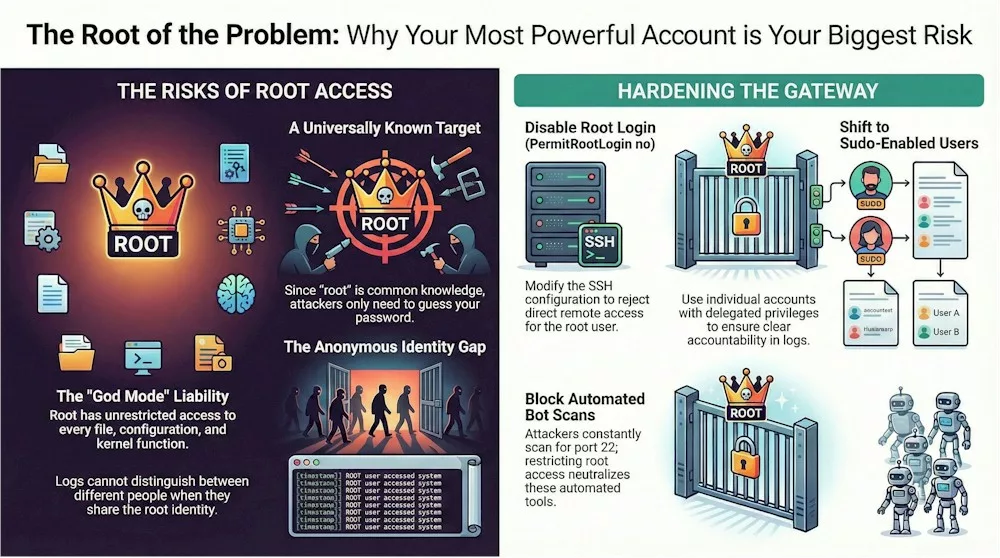
Think of the “root” account as the ultimate master key for your server; it is the most privileged identity in the system, holding unrestricted access to every single file, configuration, and command. Because it has absolute power over every kernel function and system process, it is essentially a “superman” account that can perform any action without asking for further permission. One developer I worked with once described this setup as an “open door for hackers” because it represents a dangerous single point of failure. If an attacker successfully logs in through this account, they don’t just get into one room; they take over your entire digital infrastructure.
The real reason automated bots focus so relentlessly on this account is quite simple: the username “root” is identical on almost every Linux system in the world. This means that when an attacker starts a “brute-force” attempt—where they try to guess a password over and over—they already have half of the login credentials they need. Instead of wasting time trying to guess a unique username like “Office_Admin_John,” these bots just hammer every server they find on the default port 22 using the name “root” paired with thousands of common passwords. These automated scripts are constantly scanning the entire internet for weak logins, looking for that one universally known name to gain complete control.
There is also a hidden danger I often discuss with clients called a “lack of auditability”. When multiple administrators share the “root” identity, the system’s logs—the digital breadcrumbs that record what happens—become impossible to decipher. These logs, found in files like /var/log/auth.log or /var/log/secure, might show that the “root” user deleted a critical file, but they will never tell you which specific person actually typed the command. By disabling direct root login, we force everyone to use their own unique account first, which ensures every command is tied to a specific local identity. This creates a clear trail of accountability, so you can see exactly who did what rather than looking at the digital fingerprints of a faceless superuser.
Finally, having that much power at your fingertips 24/7 is just plain risky because humans make mistakes. Since root has unlimited privileges, a single accidental typo while you’re logged in can have catastrophic effects, such as deleting essential system files or unintentionally exposing your private data to the public. Cybersecurity architects consider allowing root login a “dangerous misconfiguration” because it combines extreme risk with extreme visibility. The safest way forward is to lock the front door for root and use a standard user with “sudo” powers instead. This forces an attacker to go through a “two-stage” exploitation process: they first have to discover your secret, non-obvious username, and then they have to figure out how to steal your administrative powers.
From Passwords to Ed25519: How Do I Set Up “Unhackable” SSH Keys?
If you’re still using a password to log in to your server, think of it like using a standard padlocked gate—anyone with enough time and a big enough set of bolt cutters (or in this case, a bot that guesses passwords) can eventually get in.
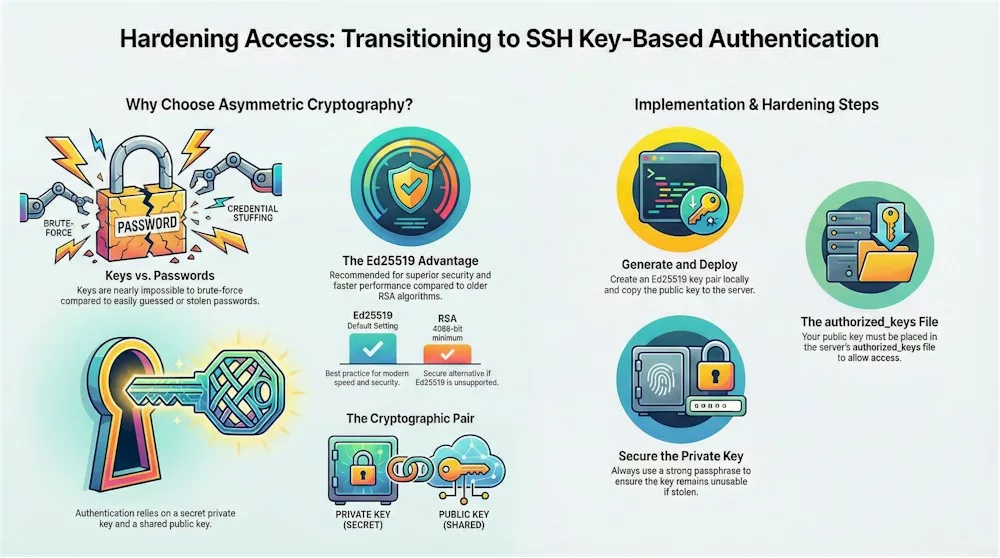
SSH key-based authentication replaces that flimsy padlock with a sophisticated asymmetric cryptography system. This involves creating a mathematically related pair of keys: a private key that you keep safely on your own computer and a public key that you share with your server. When you try to log in, the server issues a “challenge” that only your private key can solve, confirming your identity without ever sending a password across the network.
For a long time, an algorithm called RSA was the gold standard, but modern security experts now point toward Ed25519 as the best practice. It’s faster, more secure, and generates much shorter keys that are harder to break. Here is a quick breakdown of why we’re making the switch:
| Key Type | Security Level | Why use it? |
|---|---|---|
| Ed25519 | Very High | Modern best practice; fast and extremely secure. |
| RSA (4096-bit) | High | Strong alternative if Ed25519 isn’t supported on older systems. |
| Passwords | Low | Vulnerable to “brute-force” guessing attacks by bots. |
To get started, you’ll generate your keys using a simple command:
ssh-keygen -t ed25519While the system will offer to let you hit “Enter” to skip a passphrase, I strongly urge you to add one. A passphrase acts as a second layer of protection; even if someone manages to steal your private key file from your computer, they won’t be able to use it without that secret code.
Once your keys are ready, your private key stays hidden in a folder on your computer, while your public key is ready to be sent to its new home on the server.
Getting that public key onto your server is surprisingly easy if you use the ssh-copy-id tool, which handles the “heavy lifting” for you. You simply run:
ssh-copy-id username@your-server-ipand the utility automatically installs your public key in the correct spot.
If you have to do it manually, you’ll need to copy the text from your public key file (ending in .pub) and paste it into a file on the server called ~/.ssh/authorized_keys.
Just remember a golden rule for your server’s security: the .ssh folder should have permissions set to 700 and the authorized_keys file to 600 so only your user can read them.
Now comes the most important part: actually locking the door. Once you’ve verified that you can log in with your key without being asked for a password, you need to tell the server to stop accepting passwords entirely.
You’ll open your configuration file at /etc/ssh/sshd_config and change PasswordAuthentication to no. This effectively kills 100% of password-based guessing attacks because the server won’t even offer a password prompt to a hacker. As one security guide notes, “Complexity is the evil twin of security,” so keeping your setup streamlined with just keys is your best defense.
Finally, keep in mind that security is a lifestyle, not a one-time task. You should regularly rotate your keys—meaning you create new ones and delete the old ones—to ensure that even an unnoticed compromise doesn’t last forever.
Also, take a moment every few months to audit your server’s authorized_keys file to make sure no old keys from former projects or retired laptops are still hanging around. With these measures in place, your server is far better protected against common attacks.
The Sudo Prerequisite: How Can I Create an Administrative User Without Getting Locked Out?
Before we lock the front door to the root account, we need to create a “digital safety net.” In the cybersecurity world, we call this the Principle of Least Privilege—essentially, you shouldn’t give a user a flamethrower when they only need a match.
Creating a separate account with sudo (short for “SuperUser Do”) powers means you can do your daily tasks as a regular user and only “power up” to administrative mode when it’s absolutely necessary. This doesn’t just protect the system from hackers; it protects the system from you by requiring a conscious step (and a password) before you do anything that could potentially break the server.
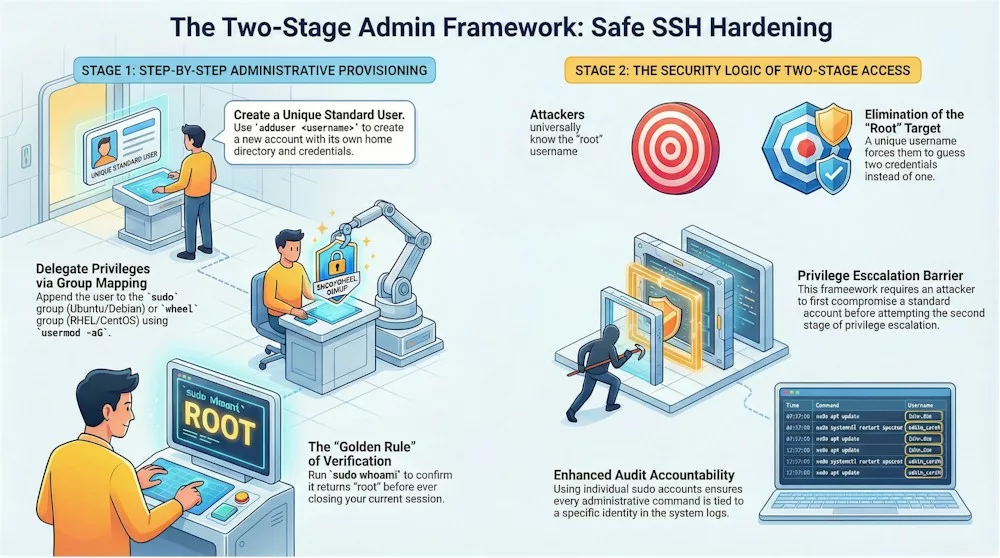
Depending on which version of Linux you’ve chosen, the tools for creating this user feel a bit different. For my friends on Ubuntu, Linux Mint or Debian, you’ll use the adduser command, which is incredibly friendly and walks you through a wizard to set your password and contact info.
If you’re using CentOS, RHEL, or AlmaLinux, you’ll likely use useradd, which is a bit more “no-nonsense” and requires you to set the password in a separate step. Regardless of the tool, the goal is the same: establishing a unique identity that isn’t the generic, highly-targeted “root”.
To make it easy, here is a quick cheat sheet for the commands you’ll need based on your system:
| Administrative Task | Ubuntu / Debian Command | RHEL / CentOS / AlmaLinux Command |
|---|---|---|
| Create New User | adduser yourname | useradd yourname |
| Grant Admin Power | usermod -aG sudo yourname | usermod -aG wheel yourname |
| Set/Change Password | (Included in adduser) | passwd yourname |
| Verify Admin Status | groups yourname | id yourname |
Once the user is created, the most critical step is inviting them to the “admin club” by adding them to a specific group—either sudo or wheel—that the system recognizes as trustworthy.
This is vital because, as the experts say, “Complexity is the evil twin of security,” and keeping your administrative framework simple ensures you don’t make mistakes that lead to a lockout. After adding your user to the group, you must verify your access before touching any other settings:
1. Switch to the new user: Type
su - yourname2. Test your “Superpowers”: Run:
sudo whoami.If the server replies with “root,” you’ve successfully set up your spare key!
You might wonder why we don’t just use the su (Switch User) command to become root whenever we want. The reason is accountability and the audit trail. When multiple people share the “root” password and use su, the system logs show that “root” did something, but they don’t say who did it!
By using sudo, every powerful command you type is timestamped and tied directly to your specific username in the logs, such as /var/log/auth.log or /var/log/secure. It’s like having a security camera in the server room that shows exactly who was at the keyboard.
If you ever find yourself staring at a “Permission Denied” screen or realize you made a typo in your configuration, don’t panic; there is always an emergency entrance. Most VPS providers offer a Web Console, which is a special out-of-band connection that lets you log in even if SSH is totally broken.
You can even use the GRUB menu during the boot-up process to force the system into a “recovery mode” shell to fix your files. However, the best way to sleep soundly is to never close your current root session until you have successfully logged in as your new user in a completely separate terminal window to verify everything works.
Silence the Noise: Does Changing the Default SSH Port Actually Improve Security?
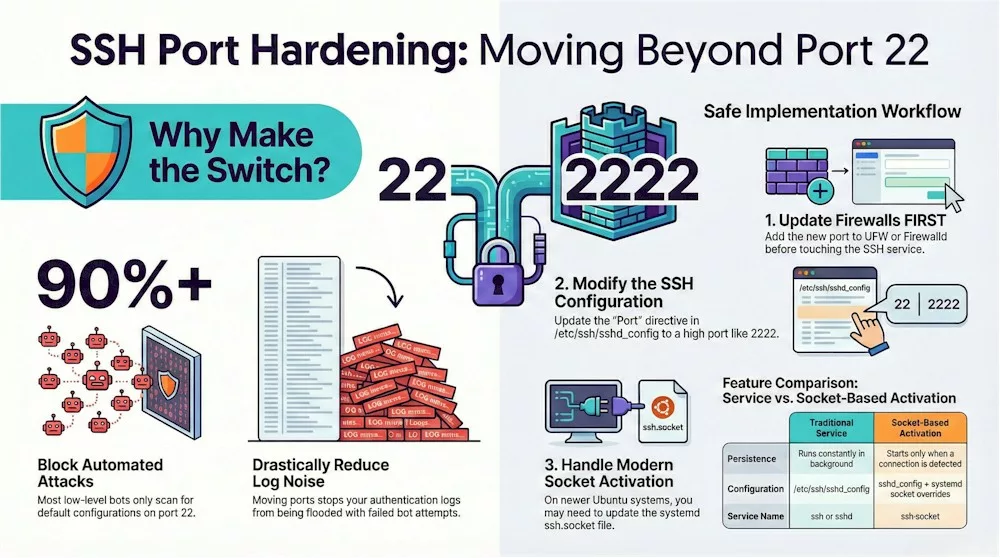
Imagine your server is a house on a very busy street. By default, your front door—the SSH service—is located at Port 22. Because everyone knows that’s where the door is, automated bots and hackers are constantly walking by and rattling the handle to see if it’s unlocked. Changing the default port is like moving that front door to a secret location in a quiet alleyway. It doesn’t make the door itself stronger, but it stops about 90% of those automated “noise” attacks from ever finding you in the first place. As we say in the industry, this is “security through obscurity”—it’s not a replacement for a strong lock (like SSH keys), but it certainly keeps the unwanted visitors away from your porch.
When you’re ready to pick a new “address” for your door, you should choose a high port number between 1024 and 65535. I usually tell my friends to avoid common numbers like 8080 or 3000, as bots often check those too. Once you’ve picked a number—let’s say 2222—you’ll head into your configuration file at /etc/ssh/sshd_config, find the line that says #Port 22, and change it to your new number. It sounds simple, but this one small change will make your server logs go from a chaotic mess of failed login attempts to a peaceful, silent screen.
| Feature | Default Port (22) | Custom High Port (e.g., 2222) |
|---|---|---|
| Visibility | Publicly known target for all bots | Hidden from basic automated scans |
| Log Noise | Flooded with thousands of failed attempts | Near-zero noise from random scanners |
| Security Level | Standard (requires extra hardening) | Adds a layer of “Obscurity” |
| Ease of Use | No extra flags needed to connect | Must specify port with -p flag |
However, if you’re using a modern version of Ubuntu (like 24.04 or 22.10), there’s a new “trick” the system uses called socket-based activation. In these newer versions, the SSH service doesn’t even start until someone actually knocks on the door.
Because of this, simply changing the number in your config file might not work, or worse, your server might end up listening on both port 22 and your new port at the same time. To do it right on these systems, you actually have to tell the “socket” (the listener) about the new port by creating a special override file. It’s a bit of a “new dog, old tricks” situation, but it’s much more efficient for your server’s memory.
Before you finalize the change and “move the door,” there is one non-negotiable step: you must tell your firewall to let you in through the new port. If you change the port but forget to update your firewall rules (like UFW or Firewalld), you will effectively lock yourself out of your own house. You’ll want to run a command like sudo ufw allow 2222/tcp before you even think about restarting the SSH service. It’s also a great habit to run a “syntax check” with sshd -t to make sure you didn’t leave any typos in the configuration that could crash the service.
To keep things running smoothly, I’ve put together a quick checklist for your move:
• Pick a unique number: Stand out from the crowd by avoiding common “alternative” ports like 2222.
• Firewall first: Always open the new port before closing the old one.
• Keep a “Safety Session” open: Never close your current terminal window until you have successfully logged in via the new port in a separate window.
• Update your shortcuts: Remember that from now on, you’ll need to use the -p flag, like ssh -p 2222 user@ip, to get back in.
As the saying goes, “Complexity is the evil twin of security,” so while we want to be safe, we also want a setup that works every time. Changing your port is a fantastic way to silence the constant background noise of the internet, letting you focus on the important work of managing your server. Once you’ve moved your door and confirmed the new key works, you’ll be amazed at how much quieter and more professional your server environment feels.
Building the Fortress: When Should I Deploy Fail2Ban and Two-Factor Authentication?
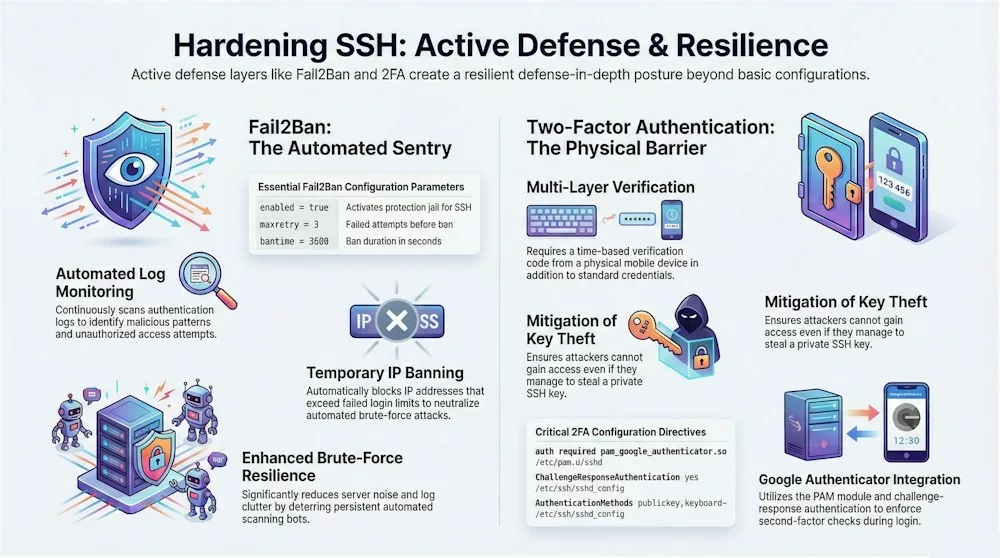
Now that we’ve locked the doors and hidden the entrance, it’s time to talk about the heavy artillery for your server’s defense. Even with SSH keys and a custom port, some high-level attackers or persistent bots might still try to find a way in. This is where Fail2Ban and Two-Factor Authentication (2FA) come into play—think of them as your digital sentry and a secondary biometric lock. While it might sound like overkill, implementing a defense-in-depth strategy ensures that your infrastructure is protected by multiple layers, making it significantly harder for any single threat to compromise your entire system.
Fail2Ban is a powerful, automated tool that acts as your server’s constant bodyguard. It works by tirelessly monitoring your authentication logs—specifically /var/log/auth.log on Ubuntu/Debian or /var/log/secure on RHEL/CentOS—looking for signs of malicious activity. If it sees an IP address failing to log in too many times, it doesn’t just keep track; it takes action by automatically banning that IP using your server’s firewall. As one cybersecurity philosophy reminds us, “Complexity is the evil twin of security,” and Fail2Ban keeps things simple by handling these bans automatically so you don’t have to.
To give you an idea of how this digital sentry thinks, here is a breakdown of the core settings you’ll configure in your jail.local file:
| Setting | What it does | Recommended Starting Value |
|---|---|---|
| maxretry | How many failed attempts are allowed before a ban. | 3 attempts |
| bantime | How long the “timeout” lasts for that IP address. | 3600 seconds (1 hour) |
| findtime | The time window Fail2Ban looks at to count failures. | 600 seconds (10 minutes) |
Once you’ve set up your digital sentry, it’s time to add the “second lock” with Two-Factor Authentication (2FA). Even if a thief managed to steal your SSH private key—perhaps by gaining access to your laptop—they would still be stuck at the door without your physical mobile device. This is the classic “something you have” (your phone) plus “something you know” (your key/passphrase) security model. For Linux servers, Google Authenticator is the most common tool for this, providing time-based verification codes that change every few seconds.
Setting up 2FA involves installing a special module (like libpam-google-authenticator) and tweaking your SSH settings to require a “challenge-response”. Once active, every time you try to log in, your server will ask for a six-digit code from your phone’s authenticator app. It adds a few extra seconds to your login process, but the payoff is a 95% reduction in successful attack attempts and the peace of mind that your “fortress” is practically impenetrable to anyone without your actual phone in their hand.
Using automated defense tools shifts you from constantly reacting to threats to preventing many of them before they become a problem. You can also confirm everything is working by running:
sudo fail2ban-client status sshdwhich shows how many login attempts have already been blocked. These final tweaks don’t just “lock down” your server — they help create a hardened, resilient setup with clear logs of every access attempt, so you always know what’s happening with your infrastructure.