Unlock Free Email Power: Set Up a High-Deliverability SMTP Server on Oracle Cloud Free Tier with CyberPanel & Cloudflare
It was just past midnight, and the soft hum of my workstation was the only sound in the room, besides the faint crackle of my coffee machine finishing its third round. I’d been troubleshooting email deliverability issues for hours – bounced messages, inbox landings that felt more like exile to spam folders. My client, a small startup trying to keep costs low, was relying on Oracle Cloud’s Free Tier. “We can’t afford another missed lead,” they said over Zoom, eyes heavy with frustration. That lit the spark. I rolled up my sleeves, cracked open CyberPanel on a fresh Oracle instance, and reconfigured our DNS records via Cloudflare with surgical precision. What followed was a deep dive into SMTP server optimization – one that I’m going to walk you through step by step. If you’re stuck in the same storm, worried about how to get your emails seen, I’ve been there. And I’ve solved it. Let’s set you up with a system that actually delivers.
To build a high-deliverability email system on a budget, start by deploying a VPS on Oracle Cloud’s Free Tier. Use CyberPanel to manage websites and email hosting, then integrate Brevo for smart outbound email delivery. This setup balances control, cost-efficiency, and inbox success.
So if you’re thinking, “Okay, I’ve got the basics – what’s next?” – stick with me. In the sections that follow, I’ll walk you through each step with precision, from spinning up your Oracle VPS and hardening it for production, to fine-tuning CyberPanel’s settings and making your emails actually land, thanks to smart integration with Brevo. I’ll also share field-tested strategies to avoid common pitfalls and boost sender reputation. This isn’t theory – it’s a hands-on guide born from real-world obstacles and the solutions that worked. Let’s build it right, together.
How to Set Up a Solid Foundation with Oracle Cloud & CyberPanel
When launching a hosting stack that balances performance, scalability, and affordability, few options rival Oracle Cloud’s Free Tier paired with the open-source power of CyberPanel. This duo offers an attractive pathway for developers, entrepreneurs, and educators to create a production-ready environment without heavy upfront costs.
The Hidden Strength of Oracle Cloud’s Free Tier
Oracle Cloud isn’t typically the first name in developer communities—but that’s starting to change. The Free Tier includes generous allocations: 2 AMD-based virtual machines (VMs), 1/8 OCPU and 1 GB memory each, 100 GB block storage, and up to 10 TB of outbound data per month. For small business hosting or web development projects, that’s substantial.
Oracle’s CTO Larry Ellison once declared, “Our strategy is simple. Offer the best technology at the lowest cost.” With their Free Tier, that promise finds real footing—especially when you compare it with other providers like AWS or Google Cloud, whose free VMs often come with stricter time limits or resource caps.
That said, Oracle Cloud’s learning curve isn’t trivial. The dashboard can be overwhelming, with deeply nested menus and a network setup that demands precision. Anecdotally, many first-time users spend more time navigating security lists and VCN configurations than actually deploying their apps. But once understood, the control it provides can be empowering.
CyberPanel: Lightweight, Fast, and Perfectly Suited
CyberPanel offers a full-featured hosting panel built on OpenLiteSpeed, which immediately delivers speed and efficiency. With a one-click installer and native support for LSCache, you get performance comparable to paid panels like cPanel – without the license fees.
More than just convenience, CyberPanel integrates email hosting, DNS management, FTP, and database control into one dashboard. Its GUI is sleek and intuitive, making it ideal for users who want to focus on managing sites rather than tinkering with config files.
This makes it particularly powerful when deployed on Oracle Cloud’s VMs. You don’t have to install dozens of packages manually – just fire up a fresh Ubuntu instance, run CyberPanel’s installer script, and you’re good to go. Plus, CyberPanel’s built-in security tools (like ModSecurity and auto SSL integration) mean fewer post-install tweaks.
Balancing Cost Efficiency and Performance
The real win in pairing Oracle Cloud with CyberPanel is strategic: you’re leveraging enterprise-grade infrastructure to run optimized hosting software, all while staying within a zero-dollar budget. But there are trade-offs.
- Oracle’s VMs are low-spec, so you need to optimize CyberPanel – disable unnecessary services, use caching aggressively, and minimize background processes.
- Outbound email traffic is restricted by default, a common pain point. You’ll likely need to configure an SMTP relay or request port access through a support ticket.
- Snapshots and backups are manual unless you configure automation, and that takes some finesse with CLI tools.
Yet, these constraints also teach thoughtful architecture. As one Reddit user put it: “Oracle’s free VPS is like a blank slate – nothing’s handed to you, but nothing’s hidden either.”
A Case for Bloggers, and Indie Builders
For those running educational platforms or personal blogs – this setup is empowering. You got the essential capability of running a online business for free:
- Building in the cloud
- Managing domains and emails
- Securing and optimizing servers
How to Set Up and Harden Your CyberPanel Email Server
Email hosting through CyberPanel gives you fine-grained control, better deliverability, and full ownership of your data. But setting it up correctly – and hardening it against abuse – requires a blend of configuration finesse, security protocols, and respect for external relay systems. Here’s how to transform your email setup from barebones to bulletproof.
Step One: Installing and Activating the Email Stack
CyberPanel includes a full email stack by default using Postfix (MTA), Dovecot (IMAP/POP3), and Snappymail (webmail interface). After spinning up your Oracle Cloud VM and installing CyberPanel, email services should be active – though not yet usable.
Start by:
- Adding your domain via CyberPanel’s “Create Website” panel.
- Navigating to Email → Create Email to register your desired mailbox.
- Testing webmail access via https://yourdomain.com:8090/Snappymail
Behind the scenes, CyberPanel automatically sets up DNS records – but you’ll still need to verify and secure them manually.
DNS & Authentication: Keys to Deliverability and Reputation
Without proper authentication, your emails are likely to end up in spam – or not delivered at all. There are three main records to configure:
- SPF (Sender Policy Framework): Defines which servers can send email for your domain.
- DKIM (DomainKeys Identified Mail): Adds a cryptographic signature to email headers.
- DMARC (Domain-based Message Authentication): Instructs receiving servers how to handle unauthenticated emails.
CyberPanel automatically generates the necessary SPF, DKIM, and DMARC records for your domain. To access them, navigate to DNS → Add/Delete Records, then select the TXT tab. As shown in the screenshot below, you’ll find everything you need to manually add these records to your domain registrar’s DNS manager.
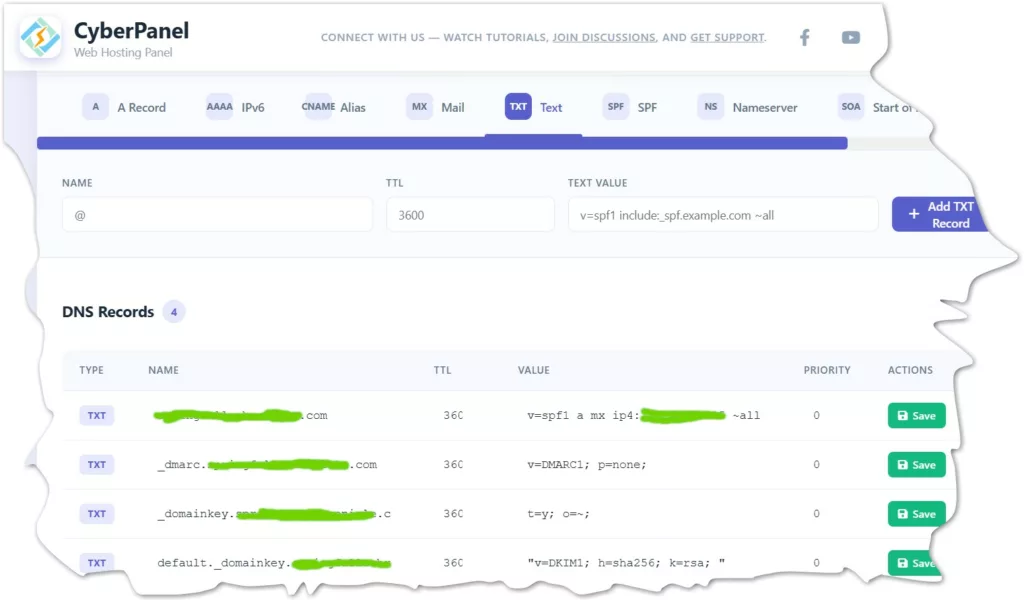
For instance, to configure DMARC, you’ll need to create a TXT record similar to:
_dmarc.yourdomain.com IN TXT "v=DMARC1; p=quarantine; rua=mailto:reports@yourdomain.com"
As one system admin famously said in an Email Server Hangout: “Getting authentication right is 80% of deliverability – everything else is spam elbow grease.”
Security Hardening & Spam Defense
CyberPanel includes ModSecurity by default – an important layer against brute-force attacks. You can also:
- Set up Fail2Ban to monitor and block suspicious login attempts.
- Limit login sessions via Postfix’s smtpd_recipient_restrictions to prevent relay abuse.
- Enable SSL/TLS for both webmail and SMTP/IMAP access.
Check /var/log/mail.log frequently to monitor traffic anomalies, failed authentications, or signs of spam relay attempts. And always keep your CyberPanel stack updated – especially its mail components.
Also consider installing RSpamd, a lightweight spam filter, to provide Bayesian spam analysis and header rewriting. It integrates smoothly with Postfix and adds another line of defense.
How Brevo Integration Supercharges Your Email Deliverability
CyberPanel’s built-in email stack is powerful but limited – especially on Oracle Cloud Free Tier, where outbound port 25 is blocked by default. Even if you request unblocking (which isn’t guaranteed), email deliverability still hinges on IP reputation and reverse DNS setups – hard to nail on shared or free-tier resources.
Integrating Brevo (formerly Sendinblue) with your CyberPanel-based email server offers a decisive edge in email deliverability. It’s like giving your messages a first-class ticket to the inbox instead of letting them languish in spam purgatory. Why? Because Brevo’s SMTP infrastructure is built to scale, track, and maintain sender reputation – something even the best self-hosted email setups can struggle with.
Brevo solves this by offering:
| Feature | Benefit |
|---|---|
| Warmed, trusted IPs | Greater inbox success |
| Built-in analytics | Track opens, clicks, bounces |
| Free tier allowance | Up to 300 emails/day for small projects |
| Easy integration | Simple SMTP relay credentials |
| Custom return-path | Helps align SPF, DKIM, and DMARC |
Using Brevo means you’re outsourcing email delivery to a specialist while keeping full control over your domain identity.
How to Configure CyberPanel with Brevo SMTP
To integrate Brevo with CyberPanel’s mail stack, follow these key steps:
- Register with Brevo, verify your domain, and access SMTP credentials.
- Open
/etc/postfix/main.cfon your CyberPanel server and set:txtrelayhost = [smtp-relay.sendinblue.com]:587 - Add your SASL credentials in
/etc/postfix/sasl_passwd:txt[smtp-relay.sendinblue.com]:587 yourlogin:yourapikey - Secure your files:bash
sudo postmap /etc/postfix/sasl_passwd sudo chown root:root /etc/postfix/sasl_passwd /etc/postfix/sasl_passwd.db sudo chmod 600 /etc/postfix/sasl_passwd /etc/postfix/sasl_passwd.db - Restart Postfix:bash
sudo systemctl restart postfix
At this point, CyberPanel routes all outgoing mail through Brevo, benefiting from their infrastructure without changing your interface or email addresses.
Let’s begin:
- The first step is heading to https://www.brevo.com and sign up using just your email address and a password. Once you’re registered, log in to access your dashboard.
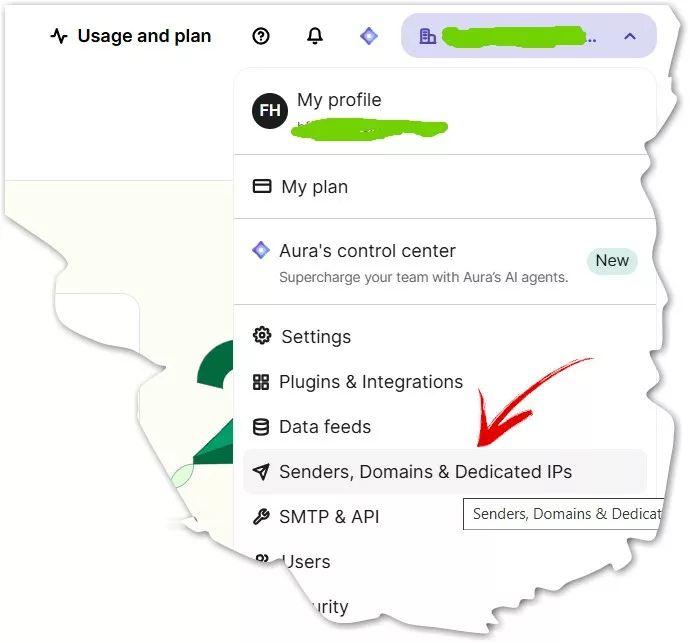
- After you login with your new registered account, the task you are going to take on is add your domain to Brevo in order to send out the email with your domain name. For that, click on your account name at the top right corner and choose the Senders, Domains & Dedicated IPs command, click it.
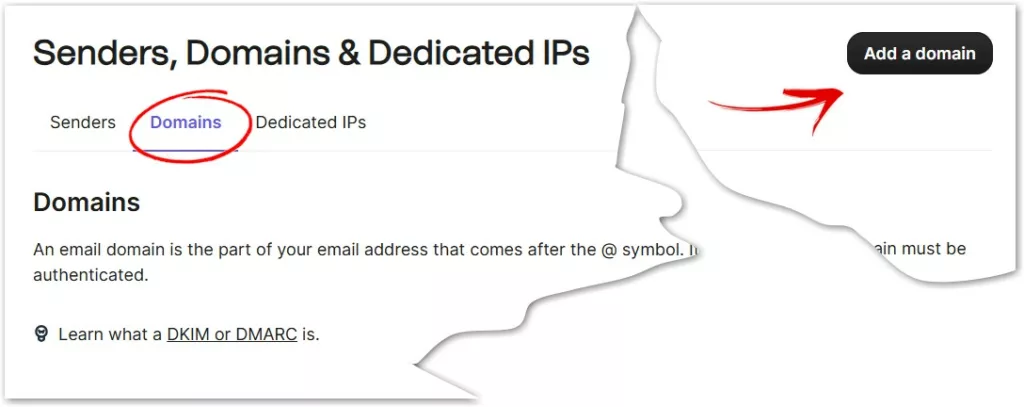
- Now you are on the page of Senders, Domains & Dedicated IPs, you will add your domain here. Click the Domains tab and then Add a domain button at the top right corner.
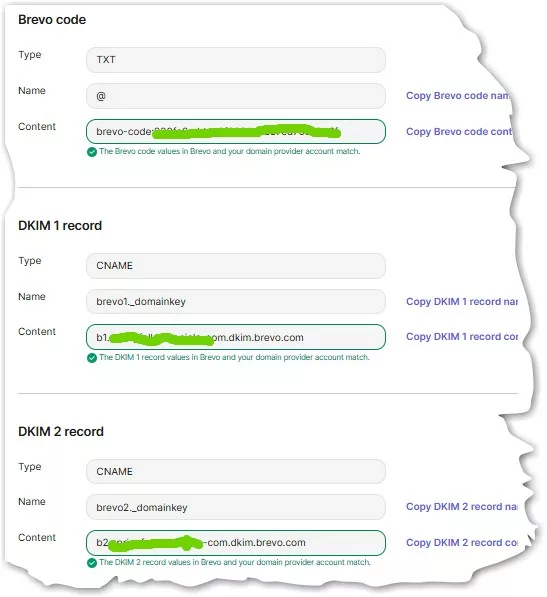
- Type your domain name into the floating window that appears. After you click the “Add a Domain” button in the window, the process that guides you through all necessary configurations begins. During the process, you will verify your domain and add a few DNS records, such as SPF, DKIM, and DMARC, in the DNS manager of your domain registrar. For example, mine is Cloudflare. When you are done, Brevo will check whether the configurations are correctly set. If they are, a green notification will appear under the suggested configuration item. (Note: you have to merge the contents of DMARC record got from CyberPanel with the one Brevo suggestsed. ) When you have seen all green signals like the screenshot below, you can ensure that you are all done with setting up your domain with Brevo.
- You can check the credential Brevo created for your email server contacts to the SMPT server of Brevo to send out the emails by clicking the top right account name and choose the SMPT & API command on the drop-down menu.
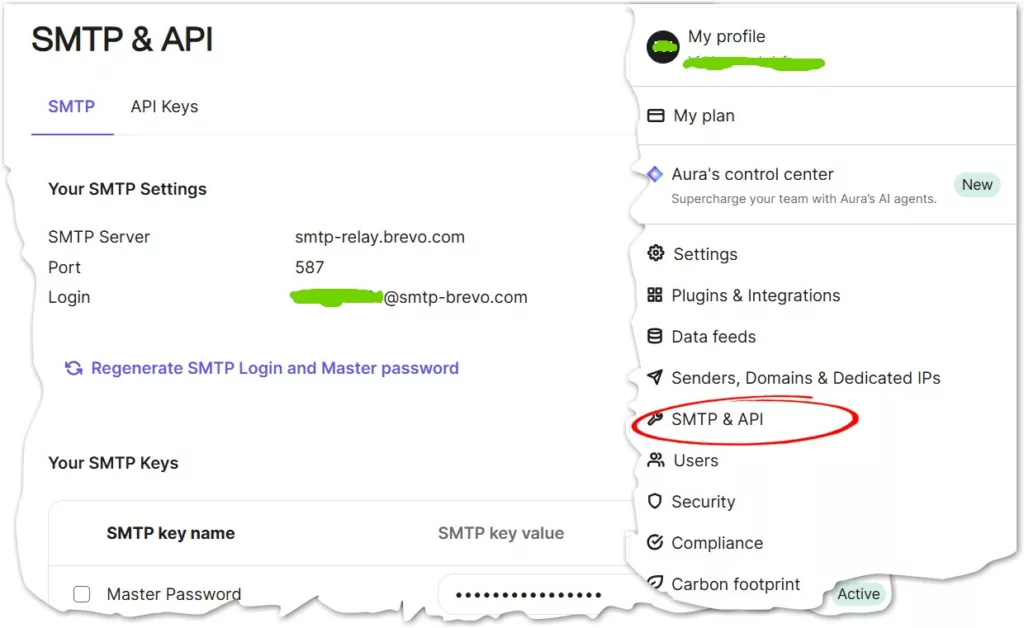
After you are here. The tasks on Brevo.com are finished. It time to configure Email Settings on Your VPS. You will edit /etc/postfix/main.cf, create /etc/postfix/sasl_passwd, secure and register your credentials, then restart the email service on your VPS.
- Access SSH: Connect to your VPS using an SSH client like PuTTY.
- Edit main.cf: Run:
sudo nano /etc/postfix/main.cf- Add the following lines to the end of the file, replacing [smtp-relay.yourprovider.com] with your actual SMTP relay server:
relayhost = [smtp-relay.yourprovider.com]:587
smtp_use_tls = yes
smtp_sasl_auth_enable = yes
smtp_sasl_security_options = noanonymous
smtp_sasl_password_maps = hash:/etc/postfix/sasl_passwd
smtp_tls_CAfile = /etc/ssl/certs/ca-certificates.crt- Save and exit (
Ctrl+X, thenY, thenEnter). - Set up SASL Password File: Run sudo nano /etc/postfix/sasl_passwd.
- Add your SMTP relay credentials in this format on a single line:
[smtp-relay.yourprovider.com]:587 YourProviderEmailAddress:YourAPIKey- Save and exit.
- Secure Credentials:
- Encrypt the password file:
sudo postmap /etc/postfix/sasl_passwd- Change permissions:
sudo chown root:postfix /etc/postfix/sasl_passwd && sudo chmod 640 /etc/postfix/sasl_passwd- Restart Postfix:
sudo systemctl restart postfix && sudo systemctl enable postfixInsider Tips for Maximum Deliverability
To extract full value from your Brevo setup:
- Use a custom domain sender (e.g.,
hello@yourdomain.com) instead of generic addresses. - Maintain list hygiene: regularly scrub bounced or unengaged contacts.
- Keep your email templates clean—avoid spammy keywords or excessive images.
As one small business owner put it on Brevo’s forum: “The SMTP relay changed everything for us. We stopped being invisible and started getting replies. It wasn’t the content – it was the pathway.”
Monitoring & Analytics That Actually Matter
With Brevo, you are ready to conduct email campaigns and you’re no longer blind to your email campaigns performance. You get detailed metrics like:
- Delivery rates
- Open and click-through percentages
- Spam reports and bounces
You can use these insights to fine-tune copy, subject lines, send times, and targeting. Combine this with tools like CyberPanel’s email logs and Snappymail’s message tracing for end-to-end visibility.
What Pitfalls Should You Avoid in Email Server Setup?
Setting up an email server might seem straightforward—but beneath the surface lurk common mistakes that quietly sabotage deliverability, security, and performance. Let’s dissect the most frequent pitfalls and how to sidestep them smartly.
1. Misconfigured DNS Records
DNS is the bedrock of email authentication. Mistakes here can cripple your sender reputation.
| Record Type | Common Mistakes | Impact |
|---|---|---|
| SPF | Overly broad +all or missing include statements | Allows spoofing, fails DMARC |
| DKIM | Invalid key length, duplicate records | Signature failures, unverifiable sender |
| DMARC | Misaligned domains, aggressive p=reject without monitoring | Legit mail rejected, poor inbox placement |
| PTR (Reverse DNS) | Points to generic hostname | Flags email as spam by major ISPs |
Tip: Use tools like MXToolbox or Mail-Tester to validate these records after setup.
2. Overlooking TLS & Port Configuration
A common misstep is leaving ports exposed without encryption or failing to enforce TLS for outbound traffic.
- SMTP ports:
- Port 25: Mostly blocked by ISPs; should be avoided for outbound mail.
- Port 587: Preferred for authenticated outbound traffic with STARTTLS.
- Port 465: Legacy SSL; acceptable if properly configured.
- IMAP/POP: Always use ports that require SSL (993 for IMAP, 995 for POP).
- No TLS fallback: Some servers don’t properly negotiate STARTTLS, sending unencrypted messages.
Secure it or lose it. Mail sent without encryption can be intercepted or flagged as non-compliant by modern mail filters.
3. Poor Queue and Bounce Management
Letting your mail queues pile up or ignoring bounces is like ignoring an engine warning light.
- Mail queue pitfalls:
- Backlogs from undeliverable addresses can trigger throttling.
- Misconfigured retry intervals flood recipients, worsening reputation.
- Bounce handling:
- Hard bounces (invalid addresses) should be removed immediately.
- Soft bounces (temporary issues) need logic to retry or suspend intelligently.
🛠 Tools like Postfix’s postsuper or Exim’s exim -bp help manage queues. Brevo’s analytics provide visual bounce trends for proactive cleanup.
4. Inadequate Access Controls & Relay Restrictions
Open relays are a big no-no – they allow anyone to send mail through your server. Even partial misconfigurations are exploited by spammers.
| Risk | Prevention |
|---|---|
| Open relay | Require SMTP authentication |
| Weak passwords | Enforce strong credential policies |
| Improper user rights | Segment access for admins vs. senders |
| No firewall rules | Limit SMTP access to known IP ranges |
Use tools like Fail2Ban, UFW (Uncomplicated Firewall), and SASL auth to layer your defenses.
5. No Monitoring or Reporting Workflow
Without visibility, you’re flying blind. Many admins skip setting up log tracking or email health reporting.
- Use CyberPanel logs (
/var/log/maillog) to trace deliverability issues - Integrate DMARC reports with tools like Postmark’s DMARC digest
- Monitor IP reputation using Talos Intelligence or SenderScore
Quote to remember:
“If you don’t monitor what’s sent from your server, you’re inviting blind spots that spammers will gladly exploit.”
What Final Tweaks Ensure Reliable Website and Email Performance?
Once your stack is deployed and functional, the final touches can make the difference between a system that merely works and one that runs reliably for months with minimal maintenance. These refinements fortify performance, enhance security, and streamline usability across both your website and email setup.
1. Automate Regular Backups
Backups are your safety net. Without them, a single misconfiguration or server issue could mean starting over from scratch.
| Tool/Method | Description |
|---|---|
| CyberPanel’s built-in backup scheduler | Automate site and email backups to local or remote storage |
| Rsync + Cron Jobs | Lightweight, command-line backup strategy for folders and databases |
| Remote SFTP/NFS Backup | Send backups to an external server or mounted share |
Pro Tip: Always keep backups in two separate locations—for example, local disk and a remote SFTP—to mitigate infrastructure risks.
2. Fortify the Firewall and Intrusion Detection
While CyberPanel deploys with basic security tools, adding layers like UFW and Fail2Ban tightens the defenses.
- UFW (Uncomplicated Firewall): Limit access to ports (only expose what’s needed).
- Fail2Ban: Monitors login attempts and bans suspicious IPs.
- CSF (ConfigServer Security & Firewall): Advanced alternative with granular control and alerts.
Quote to remember:
“Firewalls are not paranoia—they’re just knowing you’re not the only one online.”
And don’t forget: regularly update your packages using apt update && apt upgrade to patch vulnerabilities.
3. Enable Performance Boosters for Your Website
CyberPanel includes native tools to speed up your sites:
| Tool | Benefit |
|---|---|
| LiteSpeed Cache | Server-level caching for dynamic content |
| QUIC/HTTP3 Support | Faster connections, especially on mobile networks |
| Image Optimization | Reduces load time without sacrificing quality |
Also consider enabling GZIP compression and browser caching via .htaccess or CyberPanel’s UI for faster static asset delivery.
4. Monitor Email Flow & Reputation Over Time
Once mail is flowing, keeping an eye on sender reputation and engagement metrics is vital.
- Mail logs (
/var/log/maillog): Monitor for delivery failures, auth errors, or unusual spikes. - Brevo dashboard: Track bounces, opens, click-through rates, and spam complaints.
- Third-party tools: Use SenderScore and Talos Intelligence to evaluate your IP/domain reputation.
Quick tip: If your open rate drops suddenly, it could signal your emails are landing in spam—or worse, you’ve been blocklisted.
5. Housekeeping & UX Enhancements
Small usability tweaks can reduce friction for both admins and users:
- Set up auto-SSL renewals using Let’s Encrypt (CyberPanel supports this by default).
- Create redirect rules to enforce
https://across your site for SEO and security. - Schedule log rotation using
logrotateto keep system logs manageable. - Add website monitoring tools like Uptime Robot or StatusCake to stay alerted if something goes wrong.
For email, configure friendly mailbox names (support@, info@, hello@) and clear signature lines to build trust and brand consistency.